Showing posts with label Cognos BI. Show all posts

Monday, 25 August 2014

IBM Cognos BI Installation & Configuration on Redhat Linux


Those who normally work with Cognos BI on Windows Server, find it difficult to install and configure on Linux. In this blog we’ll see steps involved in this installation and configuration on RHEL. There are three parts to it.

1)      Meet the pre-requisites (Hardware & Software)
2)      Install and configure Cognos BI Server components
3)      Install and configure HTTP server

Cognos Framework Manager and Transformer are client tools and must be installed on Windows.

Meet the pre-requisites (Hardware & Software)

Let’s start with step -1. You can go thru standard supported environment specification on IBM site (http://www-01.ibm.com/support/docview.wss?uid=swg27037784). Here I am going to install Cognos BI V 10.2.1 on RHEL 6.4 system with the specification shown in below screenshot.


 We need to ensure installation of required patches before we start Cognos installation:

  • glibc-2.12-1.80.el6 (both ppc and ppc64 packages) - 32 and 64 bit glibc libraries
  • libstdc++-4.4.6-4.el6 (both ppc and ppc64 packages) - 32 and 64 bit libstdc++ libraries
  • nspr-4.9-1.el6 (both ppc and ppc64 packages) - 32 and 64 bit nspr library for CAM ldap provider
  • nss-3.13.3-6.el6 (both ppc and ppc64 packages) - 32 and 64 bit nss library for CAM ldap provider
  • openmotif-2.3.3-4.el6 (both ppc and ppc64 packages) - 32 and 64 bit openmotif libraries

One way to get these libraries is to download them independently from various Linux websites and install them. The other and probably the better way is to use your OS (RHEL 6.4 in this case) disk or .ISO image for the process. I am going to use the second option here. First I copied “RHEL6.4-20130130.0-Server-x86_64-DVD1.iso” file in /data folder (newly created) then mounted it as /media and update repository.

mount -oloop RHEL6.4-20130130.0-Server-x86_64-DVD1.iso /media
vi /etc/yum.repos.d/server.repo
rpm --import /media/*GPG*
yum clean all
  

Now to check if glibc package is already installed or not, use below command:

rpm –qa | grep glibc

If package is installed you’ll get file list (name ending with .x64_64 or .i686) in return otherwise we need to install it including dependencies using below command:

 yum install glibc.i686    // For 32-bit
 yum install glibc.x86_64  // For 64-bit

Repeat the same process for libstdc++, nspr, nss, openmotif.

We also need to have JDK 7 installed as prerequisite. I am downloading IBM JDK 7 from IBM site (http://www.ibm.com/developerworks/java/jdk/linux/download.html ) for Linux 64-bit environment and install it as shown below.

./ibm-java-x86_64-sdk-7.1-1.1.bin

It is installed in /opt/ibm/java-x86_64-71. Now we are ready for step-2.

Install and configure Cognos BI Server components

As shown below in snapshot, I have copied these 5 server components –
·         Cognos BI Server 10.2.1
·         Cognos BI Samples (optional)
·         Cognos SDK (optional)
·         Cognos Mobile (optional)
·         Cognos Dynamic Query Analyzer (optional)


 First unzip the package using below command –

  tar –xvf bi_svr_10.2.1_l86_ml.tar.gz
     cd linuxi38664h
     ./issetup

  It would open GUI based installation wizard, as shown below -


From here steps are self explanatory. I am selecting all four components from ‘Component Selection’ screen as I want all on my single server. By default ‘Cognos Content Database’ is not selected. In case, you plan to create content store somewhere else you can go ahead without it.


 Once the installation is over you can go ahead with Cognos Samples, SDK, Mobile and other server components. Add the bcprov-jdk14-134.jar  from  /cognos/c8_64/bin64/jre/1.5.0/lib/ext/bcprov-jdk14-134.jar to the $JAVA_HOME/lib/ext path

 cp /opt/ibm/cognos/c10_64/bin64/jre/7.0/lib/ext/bcprov-jdk14-145.jar /opt/ibm/java-x86_64/jre/lib/ext

We also need to add JAVA_HOME in cogconfig.sh file before opening Cognos Configuration tool.

vi /opt/ibm/cognos/c10_64/bin64/cogconfig.sh

And add below line as first executable command of cogconfig.sh file.

 Export JAVA_HOME=/opt/ibm/java-x86_64/jre

Save it and run it to start Cognos service.

./opt/ibm/cognos/c10_64/bin64/cogconfig.sh


Just test if Cognos BI service is running successfully by opening “http://localhost:9300/p2pd/servlet” on browser.


Install and configure HTTP server

You can choose your choice of HTTP server here. I am using IBM HTTP Server (32-bit). It is no-charge and can be downloaded from –

Unzip downloaded package, update JAVA_HOME in “IHS/install” file and run it.

tar –xvf ihs.7000.linux.ia32.tar
cd IHS
vi install
./install

It’ll open GUI wizard for installation.


 After successful installation we’ll add necessary virtual directories in configuration file.

 vi /opt/IBM/HTTPServer/conf/httpd.conf

Add below lines in httpd.conf

# Cognos #
# Load Cognos Apache 2.2 Module
LoadModule cognos_module "/opt/ibm/cognos/c10_64/cgi-bin/lib/mod2_2_cognos.so"

# Add WebDAV lock directory, make sure the LoadModule dav_module modules/mod_dav.so and LoadModule dav_fs_module modules/mod_dav_fs.so are uncommented
DAVLockDB /tmp/DBLOCK

# Alias for the cgi scripts
ScriptAlias /ibmcognos/cgi-bin "/opt/ibm/cognos/c10_64/cgi-bin/"

<Directory "/opt/ibm/cognos/c10_64/cgi-bin">

AllowOverride None
Options None
Order allow,deny
Allow from all
</Directory>

# Alias for the Cognos webcontent folder
Alias /ibmcognos "/opt/ibm/cognos/c10_64/webcontent"

<Directory "/opt/ibm/cognos/c10_64/webcontent">
Options Indexes FollowSymLinks MultiViews IncludesNoExec
AddOutputFilter Includes html
AllowOverride None
Order allow,deny
Allow from all
DAV on
</Directory>

Find out below lines and add ‘#’ in the beginning to comment them.

# LoadModule was_ap22_module /opt/IBM/HTTPServer/Plugins/bin/32bits/mod_was_ap22_http.so
# WebSpherePluginConfig /opt/IBM/HTTPServer/Plugins/config/webserver1/plugin-cfg.xml

We can save it now. We’ll create two file – one two start the server and another to stop it.

Create startIHS.sh with below code –
export LD_LIBRARY_PATH=$LD_LIBRARY_PATH:/opt/ibm/cognos/c10_64/cgi-bin:/opt/ibm/cognos/c10_64/cgi-bin/lib
./apachectl start

And stopIHS.sh with –
export LD_LIBRARY_PATH=$LD_LIBRARY_PATH:/opt/ibm/cognos/c10_64/cgi-bin:/opt/ibm/cognos/c10_64/cgi-bin/lib
./apachectl stop

Copy both files in /opt/IBM/HTTPServer/bin and run startIHS.sh to start the server.
  cd /opt/IBM/HTTPServer/bin
./startIHS.sh

Here’s your Cognos BI server ready for use. Open “http://localhost:80/ibmcognos” on local machine or use IP address/hostname instead of ‘localhost’. In my case, HTTP server is running on 80 port number (default).


 If you want to upgrade it with fix pack 3 which is latest please get it from below link and install it.

References:

IBM Cognos 10.2.1 official documentation (Knowledge Center)

Business Intelligence Installation and Configuration Guide

Business Intelligence Architecture and Deployment Guide


Sunday, 11 May 2014

Advanced visualization capabilities in IBM Cognos BI: Why? What? How to?


Why Visualization Matters in Analytics World?

The world produces more than 2.5 exabytes of data every day. Visualization is one key approach to gaining insight from this mountain of data. It enables you to see the trends and patterns (along with gaps and outliers) in the data that are not as easily identified in rows and columns of numbers.

Visualization can also provide access to huge data sets, such as weather, web traffic, sales and voting records. Data sets of this size have the potential to be overwhelming and inaccessible; a good visualization provides a way to explore, understand and communicate the data, along with actions the data indicate should be taken. For example, there are visualizations that show past prices for airline tickets and prices for future travel dates. From this sort of visualization, you can see whether ticket prices are trending upwards or downwards and you have guidance when considering tickets for different possible travel dates. A list of ticket prices wouldn’t be nearly as compelling or useful as showing the price variations with graphs.


The most successful visualizations have a few things in common. They have a clear purpose; they include only relevant, focused content; and they present the content in a manner that reveals and highlights the interesting relationships in the data.

Extensible visualization capabilities in IBM Cognos BI

New, extensible visualization capabilities built into IBM Cognos Business Intelligence V10.2.1.1 solutions unleash report authors and business users from a static library of charts. No longer are users locked into only the in-product visualization options. Now you can easily augment your reports—both general and active reports—with a growing collection of visualizations to meet your data and insight requirements.
 

With the new IBM Cognos Visualization Customizer, visualizations can be edited, including changing fonts, colors, or even icons to meet the most specific requirements.
Through the new Visualization Marketplace on IBM Analytics Zone, report authors can choose from over 30 visualization options, ranging from radar charts to heat maps and area charts. New visualization options will be regularly added to the Marketplace. You’ll always find just the right visualization just a simple download away.
 

Step-by-step process to extend Cognos BI visualization features -  

First of all please make sure you have Cognos BI 10.2.1.1 server installed. If you have 10.2.1 then download and install 10.2.1.1 fixpack from IBM support site


Now download all visualizations (vis.sample.all_10_2_1_1 .zip) along with documentations from AnalyticsZone site using below link. To do so you must be a member. If you are not then register yourself, its easy :).


The next step is to import these visualizations into Cognos library before we use them thru report studio.
1) Unzip vis.sample.all_10_2_1_1 .zip into a folder. You’ll get 30 zip files for 30 visualizations.
2) Open “IBM Cognos Administration” in browser and go to “Library” tab.
3) In left side panel you can see “Visualizations” item. On right side, click on “Import Visualizations” button as shown in below snapshot.


4) It’ll open a window where you can import all 30 or some visualization files one-by-one.

 
5) On successful import you can see all imported files. 

 
6) Now open Report Studio with any package. From toolbar you should drag “Visualization” tool in report area. Here you can see all 30 visualizations and select any one of your choice. Align data items and run the report. You can also use them in your active reports.


Reference:

Monday, 21 April 2014

Integrating Tivoli Directory Server (TDS) with IBM Cognos BI to provide secure & multitenant environment


IBM Cognos Business Intelligence (BI) is a enterprise class, web-based, integrated business intelligence suite by IBM which provides toolset not only traditional BI capabilities like reporting, analysis, scorecarding, monitoring of events and metrics but also expands these capabilities with planning, scenario modeling, real-time monitoring, and predictive analytics. These capabilities deliver an easy-to-use and unified experience that is collaboration and social networking enabled. The IBM Cognos BI has Service-oriented architecture - designed for scalability, availability, and openness.

IBM Tivoli Directory Server (TDS) is a powerful and authoritative enterprise directory infrastructure that is a critical enabler for enterprise security. It is an important part of the IBM Security Integrated Identity Management portfolio. It plays a key role in building the enterprise identity data infrastructure for applications such as identity management, portals, and web services. It provides a server that stores directory information using a DB2 database. It also provides a proxy server for routing LDAP operations to directory servers with database. IBM Security Directory Server provides client utilities and graphical user interfaces (GUI), such as Instance Administration Tool (idsxinst) and Configuration Tool (idsxcfg), to manage servers.

IBM Tivoli Directory Server provides:

  • Industry-standard architecture and broad platform support for a range of operating systems and applications and a variety of heterogeneous environments.
  • Strong scalability and flexibility to support hundreds of millions of entries using IBM DB2 technology and a built-in proxy-server.
  • Availability to support an identity data infrastructure for global online applications such as consumer-driven web services.
  • The ability to help you manage identities in the cloud.
  • Robust auditing and reporting that provides insight with connectivity to IBM QRadar SIEM and greater visibility into repository with sample reports.

You can use IBM TDS to provide a trusted identity data infrastructure for authentication. As we know Cognos BI doesn’t provide its own authentication mechanism but leverage your existing mechanism which you are using across enterprise applications. In this blog article our objective is to leverage existing security features for authentication and data transfer of TDS based LDAP with IBM Cognos BI to order to secure BI assets and setup multi-tenancy environment.

This blog article describes the step by step procedure for –

1)     Setting up TDS 6.2 environment on Windows 7 OS

2)     Integrating IBM Cognos BI 10.2.1 Server with TDS 6.2.

3)     Enable Multitenancy for Cognos BI environment

Also see –


Setting up TDS 6.2 Environment on Windows 7 OS

1)     Installation steps are pretty easy and intuitive for TDS 6.2 by just double clicking install_tds.exe file but if you are using later editions then you need to install it thru IBM Installation Manager. Steps can be found here - http://publib.boulder.ibm.com/infocenter/tivihelp/v2r1/topic/com.ibm.IBMDS.doc_6.3.1/concept/c_ig_InstallationWithIBMInstallationManager.html

2)     On the completion of installation, you can see ‘IBM Tivoli Directory …’ windows services (Start->Programs->Administrative Tools->Services). The default port used by TDS for LDAP service is 389.


3)     To create and manage directory instances click on “Instance Administration Tool” from “IBM Tivoli Directory Server 6.2” folder in Start Menu - > All Programs as shown in snapshot.


4)     Click on “Manage…” button. It’ll open TDS Configuration Tool. Besides getting info about your setup you can also perform many tasks listed on left side panel as shown in below snapshot. Click of “Manage suffixes” task.


5)     We need to add “dc=example,dc=com” as a new suffix before importing our example LDIF. After successful addition you would see it in “Current suffix DNs” list.


6)     Below given is the glimpse of sample LDIF, you can download the attachment (http://www.megafileupload.com/en/file/521432/IBM-TDS62-ldif.html) and change is as per your requirements. I’ve created 11 users having userid admin, user1 – user10 with password – “password”. Lets click on “Import LDIF data”.


7)     Import sample LDIF file.


8)     On successful restoration start the server instance from “Manage Server State” task on the left side, shown in below snapshot.


Integrating IBM Cognos 10.2.1  BI Server with TDS 6.2

It is assumed that Cognos 10.2 BI server is already installed and is in working condition. Open ‘IBM Cognos Configuration’ from Start -> All Programs -> IBM Cognos 10 – 64.

1)      In the Explorer window, under Security, right-click Authentication, and then click New resource -> Namespace.

In the Name box, type a name for your authentication namespace (we used ‘IBM_TDS62’ here) and in the Type list, select ‘LDAP – Default values for IBM Tivoli’ and click OK.


2)      Select the newly created namespace. In the ‘Resource Properties’ window in right, for the Namespace ID property, specify a unique identifier for the namespace as TivoliLDAP is assigned in the below screenshot. All entries with Red arrows are manually provided to integrate with the TDS environment we created in above section.


 3)     If you want the TDS to bind to the directory server using a specific Bind user DN (Distinguished Name) and password when performing searches, then specify these values.


If no values are specified, the LDAP authentication provider binds as anonymous.

If external identity mapping is enabled, Bind user DN and password are used for all LDAP access. If external identity mapping is not enabled, Bind user DN and password are used only when a search filter is specified for the User lookup property.

4)     You can use user attributes from TDS in namespace configuration. To configure this, you must map these attributes with appropriate property name as shown in below snapshot. ‘Custom properties’ would be available as session parameters through Framework Manager.


 5)     From the File menu, click Save. Test connectivity to the namespace by right clicking on the name under Security, Authentication and selecting test. If the test is successful, this message box will appear.


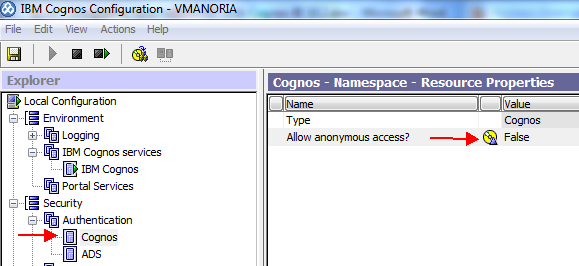
If you want to disable anonymous access, make sure you disable it by setting ‘Allow anonymous access?’ property for ‘Cognos’ namespace as shown below in snapshot. 


6)     Restart Cognos service from toolbar. 


7)     Now anyone who wants to access Cognos (http://localhost/ibmcognos), would be asked for authentication credential. Let us login with LDAP administrator credential.


Directory administrators would have Cognos admin privileges. Go to Cognos administration.


8)     In ‘IBM Cognos Administration’, explore ‘Users, Groups, and Roles’ under ‘Security’ tab. One can see the new namespace (IBM_TDS62). Click on it to view all users belongs to the directory.


Administrator now can assign different privileges and roles to these directory users as per application security requirements by setting relevant properties. Once security permissions are assigned, LDAP users are ready to use Cognos BI. For more information on security, please refer to “IBM Cognos BI Administration and Security Guide”.

Enable Multitenancy for Cognos BI environment

1) We need to set multitenant properties from IBM Cognos Configuration tool to enable this feature.  In IBM Cognos Configuration tool, select Security->Authentication->IBM_TDS62 in Explorer (left pane) window. Now select ‘Advanced Properties’ from right window (Resource properties) and add two new values before pressing OK button -

a)     Name – ‘multitenancy.TenantPattern’ value – ‘~/parameters/tenantID’

b)     Name – ‘AdditionalUserPropertiesToQuery’ value – ‘parameters’


2) Now, select ‘Custom Properties’ from right window (Resource properties) and add a new value –

Name – ‘tenantID’ value – ‘l’


3) From the File menu, click Save. Test connectivity to the namespace by right clicking on the name under Security, Authentication and selecting test. If the test is successful, this message box will appear.


4) Save the configuration and restart Cognos service. Your Cognos multitenancy feature is enabled. 

There are many tasks follows this step to realize benefits of multitenancy in BI project. Please refer to my previous blog article http://vmanoria.blogspot.in/2014/03/ibm-cognos-bi-setting-up-multi-tenancy.html to see how to manage/administrate multi-tenant environment.